Tips for replacing brakes on a salvage motorcycle


When it comes to replacement parts for salvage motorcycles, understanding the nuances of braking systems is essential for both safety and performance. Salvage motorcycles often come with a history of wear and tear, making it imperative to inspect and replace brake components thoroughly. Whether you’re a seasoned mechanic or a DIY enthusiast, knowing the right strategies can significantly enhance your bike’s functionality.
One of the first steps in any replacement process is assessing the current state of the brake system. Salvage bikes may have damaged or corroded parts that compromise safety. Thoroughly examining brake pads, rotors, and calipers will provide insight into what needs immediate attention. Prioritize replacing worn-out components to ensure optimal braking performance.
Additionally, it’s crucial to choose quality parts when undertaking replacement tasks on salvage motorcycles. Consider the compatibility of each component with your specific model, as not all motorcycle parts are universal. Investing in high-quality brake components not only enhances safety but also improves the longevity of your overall motorcycle.
By following these tips on the replacement of braking parts in salvage motorcycles, riders can ensure a safer and more enjoyable riding experience.
Identifying the Right Brake Parts for Your Salvage Motorcycle
When it comes to restoring a salvage motorcycle, identifying the correct brake parts is crucial for ensuring both safety and performance. Start by consulting the motorcycle’s service manual, which typically provides specifications for brake components including calipers, rotors, and pads. Accurate identification can prevent compatibility issues that may arise from using mismatched or inferior parts.
Understanding Brake Types: Different motorcycles are equipped with varying brake systems, such as disc brakes and drum brakes. Familiarize yourself with which type is installed on your salvage motorcycle to ensure proper replacement. For instance, disc brakes require specific rotors and pads suitable for their design, while drum brakes involve replacing shoes and cylinders.
OEM vs. Aftermarket Parts: You have options when replacing brake components. Original Equipment Manufacturer (OEM) parts are designed specifically for your bike model, ensuring precise fit and performance. However, aftermarket parts may provide more options in terms of pricing and performance enhancements. Research reputable brands that offer reliable aftermarket parts to maintain safety.
Assessing Condition: Before purchasing replacement parts, examine the existing brake components. Look for signs of wear, such as cracks or scoring on the rotors. If the pads or shoes are worn down past the manufacturer’s recommendations, they need replacement. For salvage motorcycles, parts may also be salvaged from other bikes if they are in good condition.
Consulting Experts: If you are unsure about which brake parts to choose, don’t hesitate to seek advice from mechanics or enthusiasts who specialize in motorcycles. Online forums can also provide insights from others who have undertaken similar restoration projects.
Ultimately, gathering accurate information and adhering to the specifications for your salvage motorcycle will lead to informed decisions. Prioritizing quality brake components will significantly enhance the overall safety and performance of your ride.
Step-by-Step Guide to Replacing Brake Components Safely
Ensuring your motorcycle’s braking system is in optimal condition is crucial for safety. This guide provides a clear, step-by-step process for the replacement of brake components on salvage motorcycles.
Step 1: Gather Necessary Tools and Parts
Before starting, make sure you have the required tools: a socket set, wrenches, screwdrivers, and a brake bleeder kit. Additionally, acquire replacement brake pads, rotors, and any other components specified for your motorcycle model.
Step 2: Secure Your Motorcycle
Stability is essential. Use a motorcycle stand or jack to lift the bike. Ensure it is held securely to prevent any movement during the replacement process.
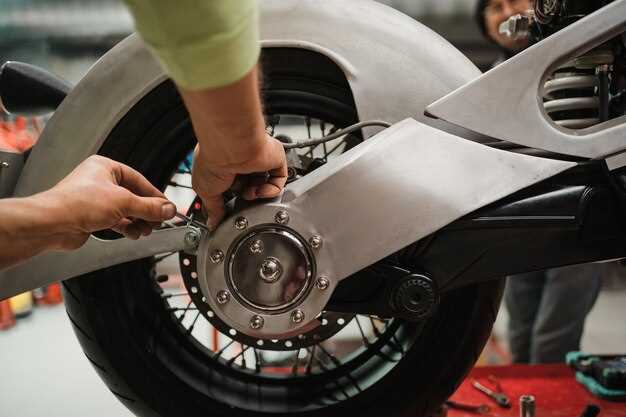
Step 3: Remove the Wheel
Loosen the wheel axle nuts and carefully remove the wheel to access the brake components. Take note of how everything is arranged to make reassembly easier.
Step 4: Remove Old Brake Components
Start with the brake caliper. Unscrew the caliper bolts and carefully detach it from the rotor. Remove old brake pads by sliding them out of the caliper. If necessary, remove the brake rotor if you are replacing it.
Step 5: Inspect Components
Before installing new components, inspect the caliper, brake lines, and rotor surface. Look for any wear or damage that may need attention before proceeding with the replacement.
Step 6: Install New Brake Components
Begin by installing the new brake pad into the caliper and reattach the caliper to its mount. If you replaced the rotor, ensure it is securely attached using the appropriate bolts.
Step 7: Bleed the Brake System
After installation, use a brake bleeder kit to remove air from the brake lines. Follow proper bleeding procedures to ensure a firm brake lever and effective braking performance.
Step 8: Reattach the Wheel
Carefully position the wheel back into place and secure it with the axle nuts. Ensure everything is tightened according to manufacturer specifications.
Step 9: Test the Brakes
Before riding, test the brake lever to ensure it feels firm. Spin the wheel and check for any unusual noises. Conduct a slow test ride to confirm that the braking system is functioning correctly.
Step 10: Regular Maintenance
Keep track of component wear and maintain your motorcycle’s brake system regularly. Regular checks and replacements will enhance performance and safety.
Common Mistakes to Avoid When Upgrading Brake Systems

When upgrading the brake system on a motorcycle, it’s crucial to understand the potential pitfalls to ensure a successful replacement. One of the most common mistakes is failing to select the right components that match the motorcycle’s specifications. Always verify compatibility with your specific make and model before finalizing any purchase.
Another mistake is neglecting to replace associated components during the brake upgrade. Upgrading the brake pads without replacing worn rotors or lines can lead to compromised performance and safety. A complete brake system upgrade should include all necessary parts for optimal effectiveness.
Improper installation is also a frequent error. Many enthusiasts underestimate the importance of following manufacturer guidelines during the installation process. Failing to torque fasteners to the proper specifications or misaligning components can lead to premature wear or complete brake failure.
Inadequate testing after the replacement is a significant oversight. After installing new brake components, it’s essential to conduct thorough tests in a safe environment to ensure everything functions properly before taking the motorcycle on the road.
Lastly, ignoring the need for routine maintenance after an upgrade can diminish performance over time. Regular checks on brake fluid, pad thickness, and overall system health are necessary to maintain enhanced braking performance on your motorcycle.