Rebuilding a bike using only salvaged parts – is it possible?


In today’s world of increasing sustainability and cost-effectiveness, the idea of rebuilding a bike using salvaged parts is gaining traction among cycling enthusiasts and DIYers alike. Instead of purchasing a brand new bike, many riders are exploring the possibilities of creating a custom ride from discarded components. But is this approach really feasible? This article delves into the practicalities of sourcing and assembling parts to breathe new life into an old frame.
Rebuilding a bike involves a careful balance of creativity, technical skill, and resourcefulness. It opens up opportunities to understand the mechanics behind a bike, allowing riders to gain valuable insights into its operation. Furthermore, salvaged parts often come with a lower price tag, making for an economical means to achieve a personalized cycling experience. However, this endeavor is not without its challenges; issues such as compatibility, quality, and safety must be taken into consideration.
In this exploration, we will evaluate the various factors involved in the process of rebuilding a bike. We will assess where to find quality salvaged parts, how to evaluate their condition, and the essential tools and knowledge required for a successful rebuild. Ultimately, this article aims to equip aspiring builders with the information they need to embark on their own bike rebuilding journey.
Rebuilding a Bike with Salvaged Parts: Is it Feasible?
Rebuilding a bike using salvaged parts can be a rewarding project for both seasoned cyclists and hobbyists. The feasibility of this endeavor hinges on several factors, including the condition and compatibility of the salvaged components, the skills of the builder, and the intended use of the bike.
First, sourcing quality salvaged parts is crucial. Look for components that are not severely damaged and show minimal wear. This may include frames, wheels, handlebars, and drivetrains. Many bike shops, online marketplaces, and recycling centers provide a range of options. Ensure that the parts are compatible with one another, as mismatched components can lead to performance issues or safety hazards.
Secondly, the builder’s experience plays a significant role. For those with mechanical knowledge, rebuilding a bike from salvaged parts can be a straightforward task. Understanding how to properly assemble the bike, adjust components, and ensure proper safety standards are essential. For novices, however, it might be beneficial to seek guidance from experienced bikers or instructional resources.
Finally, consider the bike’s purpose. If the bike is intended for casual riding, using salvaged parts may be sufficient. However, for more demanding applications such as racing or mountain biking, investing in higher-quality, new components may be worthwhile to ensure performance and reliability.
In conclusion, rebuilding a bike with salvaged parts is feasible, provided that quality components are sourced, the builder possesses or acquires the necessary skills, and the project aligns with the bike’s intended use. This practice not only promotes sustainability but also allows for a personalized bike that can serve as a testament to the builder’s creativity and resourcefulness.
Evaluating the Quality and Compatibility of Salvaged Bike Parts
When undertaking the project of rebuilding a bike, evaluating the quality and compatibility of salvaged parts is crucial. First and foremost, it is essential to inspect each component thoroughly. Look for any signs of wear, rust, or damage. Worn-out brake pads or frayed cables can significantly affect safety and performance. Therefore, prioritize components that are in good condition or capable of being refurbished.
Next, compatibility with other bike parts must be assessed. Not all salvaged components will fit seamlessly together. For instance, a salvaged rear derailleur may not work properly with a different cassette or shifter. Understanding the bike’s specifications, such as the drivetrain type and wheel sizes, is vital for ensuring that each salvaged part will integrate well into the overall system.
Researching the brand and model of the salvaged parts can also provide insight into their reliability and performance. Some manufacturers have a reputation for producing long-lasting components, while others may be known for lower quality. Additionally, checking for compatibility across different brands is important, as some parts are designed to work within specific systems or standards.
Finally, consider the age of the salvaged components. Older parts may not only be less reliable but also harder to find replacement pieces for. If a part has been discontinued or is no longer available, it might lead to challenges in maintenance in the long run. Therefore, striking a balance between salvaged parts and new components could be the best approach for a successful bike rebuild.
Cost Analysis: Comparing Salvaged Parts vs. New Components

When considering the feasibility of rebuilding a bike, a crucial factor is the cost of components. Evaluating salvaged parts against new components can provide insights into budget management and overall project viability.
Salvaged parts offer several advantages:
- Cost Savings: Salvaged components are typically much cheaper than new alternatives. A well-maintained set of used parts can save significant money.
- Environmental Impact: Using salvaged components reduces waste and is a more sustainable option.
- Unique Characteristics: Older or rare salvaged parts can give the bike a unique aesthetic or performance characteristics that new components may lack.
However, there are challenges associated with salvaged parts:
- Unknown History: The condition of salvaged parts may not be thoroughly documented, leading to potential reliability issues.
- Compatibility Issues: Ensuring all salvaged components fit together properly can be complex, particularly with older bikes.
- Time Investment: Sourcing quality salvaged parts can require considerable effort and time.
On the other hand, opting for new components has its own set of advantages:
- Reliability: New parts generally come with warranties and guarantees, ensuring better performance and longevity.
- Easier Installation: New components are often designed to fit current standards, reducing compatibility concerns.
- Accessibility: New parts are readily available through numerous retailers, making the purchasing process more straightforward.
However, the drawbacks include:
- Higher Costs: New components can drastically increase the overall budget for rebuilding a bike.
- Depreciation: Unlike salvaged parts, new components lose value quickly once used.
- Environmental Concerns: Producing new bike parts contributes to resource consumption and waste.
In conclusion, the decision to use salvaged parts versus new components largely depends on budget constraints, desired performance, and personal preferences. A balanced approach may involve utilizing salvaged parts where feasible while supplementing with new components for key elements that require reliability.
Step-by-Step Guide to Assembling Your Bike from Salvaged Parts
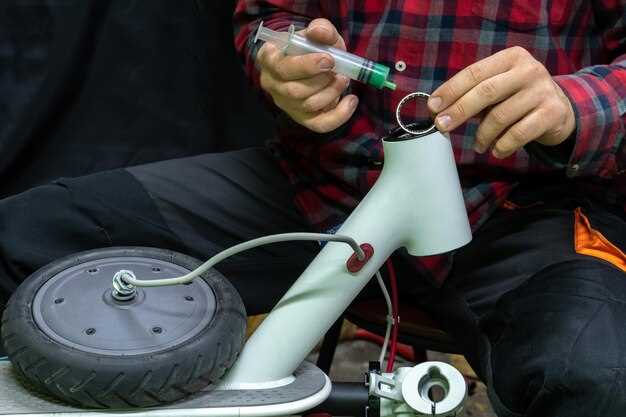
Assembling a bike from salvaged parts can be a rewarding experience, both in saving money and creating a unique ride. This guide will take you through the essential steps to ensure a successful rebuild.
Begin by gathering all necessary salvaged parts. Check local bike shops, online marketplaces, or community bike projects for discarded components. Common salvaged parts include frames, wheels, brakes, gears, and handlebars. Assess each part for compatibility and condition before proceeding.
Once you have your parts, start with the frame as your foundation. Clean it thoroughly to remove any rust or debris. Inspect for damage; if there are any cracks or structural issues, consider finding an alternative frame.
Next, install the bottom bracket and crankset. Ensure the bottom bracket is compatible with your frame. Use appropriate tools to secure these components, as they provide crucial support for pedaling.
Mount the forks onto the frame to prepare for wheel installation. Ensure that the headset is properly seated and tightened. After the forks are in place, attach the front wheel. Verify that the wheel spins freely and aligns correctly.
Proceed to install the rear wheel, making sure it’s secure and evenly situated in the dropouts. If you’re using salvaged gears, ensure they are compatible with your derailleur and that they shift smoothly.
The next step involves attaching the brakes. Use salvaged brake calipers and levers, ensuring they function correctly. Adjust the brake cables accordingly for optimal responsiveness.
When the brakes are in place, proceed to install the handlebars. Adjust the position for comfort and ensure they are securely fastened. Connect the brake and shift cables, ensuring they run smoothly without any tangles.
As a final touch, add pedals and a saddle. Make adjustments to the saddle height once the bike is assembled to ensure a comfortable riding position. After everything is in place, perform a thorough inspection of the bike.
Finally, take the bike for a test ride. Pay attention to how the bike handles and brakes. Make any necessary adjustments to improve performance. With patience and attention to detail, your salvaged parts will come together to create a functional and satisfying ride.